Friday, September 7, 2012

Flipping A House 101

My mom loved houses and always dreamed of buying a poor rundown house, giving it new life and then selling it for a profit.
Mom

This desire filtered down into my brothers who have successful done what my mom would of loved to do. One brother has put his touch on residential homes and the other put his mark on commercial properties.

I also love the idea of fixing up a house and giving it some new life and of course making a profit while I'm doing it.

So come Monday September 10 I'll be closing on a house in a community called Kings Ridge   in Clermont Florida.

My Flip 

The home is 1333 sq ft and has 2 bedroom, 2 bathrooms, an office, an eat in kitchen, a living room and dining room. As I learn the ins and outs of Flipping Houses I'll share my knowledge with you.

Thursday, September 6, 2012

It's Been Quite Awhile

I think March was my last post and back then I decided to quit being a blogger.

 It takes focus and a lot of work to make a blog successful and I lacked the drive needed. Part of the problem was I didn't have a clear vision for my blog and I just sort of followed what others were doing which contributed to my being lost and a quitter.

But now I have a big new project (that's all mine) that I'll be working on for the next four weeks and I'm looking forward to taking pictures and writing about my experiences. So stop back tomorrow to check out what I'm up to.  


Sunday, March 4, 2012

Using What I Have Challenge!

The challenge that I have accept to take is to Use What I Already Have in my creative projects. This at first seemed to be a bit daunting but it turned out to be so much fun.

So for today my goal was to make some pillows out of cloth napkins.

Right away the opportunity came up to put this challenge to the test. 

I had already printed out this wonderful bird image from the Graphics Fairy web site and once that was done and ironed on the napkin I realized that the image was a bit too small for the size pillow it was going to be.  Normally I'd run to the fabric store frantically trying to find a solution, but nope the challenge was to use what I had on hand.

So hunting in my stash of stuff I found this wonderful ribbon (that I already had) that was perfect.  Not having any brown thread on hand to sew the ribbon onto the pillow I then decided I'd use some of that iron on tape I had saved from some Ikea curtains.  I was pretty surprised this challenge thingy wasn't really a challenge but was a way to get my creative juices going. 

I am so pleased with the design and to think that I had everything that the pillow needed. No running to the store wasting time and dollars, the pillow design ingredients were already there.


Oh yeah you see that line in the image but you are way too polite to mention. Yes it was a goof up on my part. I let the hot iron hit the image and it created that line. Another one of those lessons learned, such as protect your iron on image with cloth if using an iron near it.

This challenge for me is on going and with the stash of stuff I have I should be unstumped for quite a long time. 

BTW with that obvious line the pillow has found a home with me.


I'm Partying At The Following
Sunday's Best at My 1929 Charmer
Brag Monday at the Graphics Fairy

Friday, March 2, 2012

How To Tea Dye Fabric!

I love using fabric in my projects, I'm a bit of a fabricaholic, can't go into a fabric store without drooling and buying.

Sometimes though the newness of the fabric just sets me on edge a bit. It's the fabric stiffener and the brightness of the colors that I think does it to me and so I use tea dying to give the fabric a look of.... maturity. (that sounds so much better than old) 

WHAT YOU WILL NEED

Tea bags of course, lots of them. 

Picture Source


A Big Pot, Like A Pasta Pot! 

Picture Source


Water! 

Picture Source 


Fabric

Picture Source


FIRST gather your fabrics. Keep in mind the size of the pot and gather according to what will fit. I've tea dyed solid colors and all sorts of prints from muslin to decorator's fabric. All the fabric I do dye is washable and I've never done a dry clean only type of fabric. I then soak my fabric in clear water, usually in my kitchen sink. Once all the fabric has been completely wet I then wring out as much of the water as I can and place them waiting for the dye bath.  I've noticed that if I do this first step the fabric accepts the dye better and reduces streaks.

SECOND let it boil. Add the water to your large pot leaving room at the top so the fabrics won't cause your water to spill over.  Set it on the stove and get that water boiling.

THIRD  get your tea bags ready. I like to remove the little paper tag on the string just so the printed dye doesn't bleed into my dye. It probably wouldn't but just in case.  How many you ask?  Well I do about 30 bags for my big pot but I do like a visual tea dyed look.  Do a bit less for a less browny vintage look.  You will have to experiment to see what works best for you. 

FOURTH  add the tea bags. Once the water reaches the boiling point start adding your tea bags using a spoon to coax the bags into getting fully wet. With all the tea bags added to the pot and wet I let the water boil for about another 2 minutes to get a rich deeper brown dye. 

FIFTH  add fabric. Turn off the gas and then submerge the fabric into the brown dye using the same spoon you used to get the tea bags wet. You don't want to put your hands in boiling water, use the spoon. Yes!  I let the fabric and tea bags co-mingle. I've never had the problem of the tea bags bursting open and causing a mess. If you would rather remove the bags do so after the 2 minute boil and do it carefully. 

SIXTH relax and wait. Hard part is over now it's a waiting game. I usually don't start checking my fabric until the water has cooled down to lukewarm. That's about 2 hours. On occasion I've left my fabric in the dye bath overnight to get a real deep color but usually I'm happy with the results when I first check. Once the batch is done you could add more fabric to the cool water and the dye still works but it doesn't come out as dark as quickly. That's my observation. 

SEVENTH  Rinse and repeat. Your happy with the color keeping in mind wet it will look darker. Now back to the sink.  Your fabric needs to be rinsed of all its tea. I  fill my kitchen sink with clear water and swoosh my fabric around until I see the water turn brown. Empty the water from the sink and repeat, it usually takes about three times for the fabric to be totally rinsed out.. I line dry my dyed fabrics because I don't want to deal with fraying edges of the fabric that might happen in the dryer.

OOPS  Not what you expected.  There's always a do over here, just add your fabric to your bleach wash and it will be back to original color.

Now if I had to do large yardage of fabric I would have to find another way to do it, a pot even a pasta pot will hold just so much fabric. If I'm making a pillow I'll dye the fabric after the pattern pieces have been cut. I also find small scrap amounts of fabric that I have on hand and give them the bath also. 

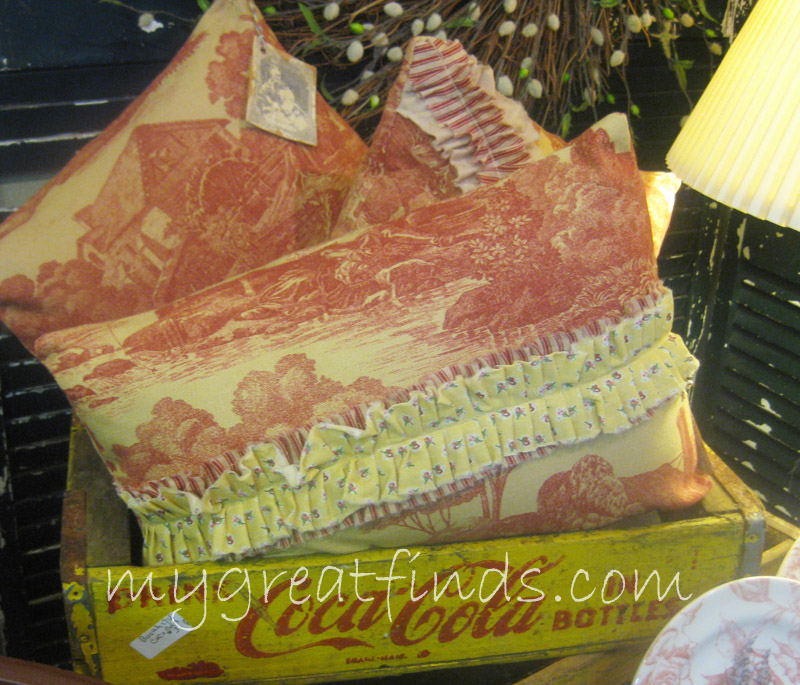
 The top fabric on these pillows is a osnaburg fabric that I tea dyed to give it an aged look. The bottom portion of the pillow was an upcycled fabric from an aged seen better days pillow.

Tutorials are great but it's been my experience that you just need to get in there and get your hands dirty (try it)  If you have any questions let me know I'd love to help. 

Friday, February 24, 2012

I'm In Love With My Ruffle Attachment For My Sewing Machine.

I always knew I like to sew but once I tried my new ruffle attachment LIKE turned to LOVE. Really, how come I never knew about this wonderful tool?

I went to my local sewing store and they weren't too sure on what type of foot I needed either a low shank or high shank foot, well neither did I.  I then strolled over to Ebay and came upon "Gone Sewin" Ebay store and there she was....... my ruffler.  Gone Sewin listed my Kenmore model number and I knew then it was a fit.


Gone Sewin says about this ruffler


So once I started on using the ruffler I just couldn't stop. It was almost magical!

So here are some pictures of pillows I enhanced with ruffles. 


This one I did in the envelope style and just because....... I added the ruffle.


Okay this red and white check are actually two fabric napkins sandwiched together with...... you guessed it some ruffles. 


I went ruffle crazy by adding one ruffle on top of the other mixing different colors.  I'm doing a happy camper dance. 


More things are in the works for me and my ruffler. It's a marriage made in heaven I'm thinking. Okay I'm off to do...... bet you can't guess!  

BTW I've not been paid to endorse this ebay store.

 I'm linking up at these parties
Vintage Inspiration Friday at Common Ground
Feathered Nest Friday at French Country Cottage
Fridays Unfolded at Stuff and Nonsense 
Inspiration Fridays At The Picket Fence

Wednesday, February 22, 2012

Using Water Slide Decal Paper

After having read some of Carol's of Polka Dot Closet fame tutorials on water slide decals I knew I had to try it. 


She recommended the Papilio.com web site as a source for quality decal paper.


So I figured if Carol loved the Papilio water slide decals, I would to.  

One of the nice things about Papilio site is all the instructions they have.  I purchased the following additional items as they suggested.  

The decal film spray is used to protect the ink when you submerge your paper in water.

"The Papilio Decal Film is simply a superior product to any clear aerosol spray available on the market for arts and crafts use. It is manufactured especially to form flexible film that will work with water slide decal paper, a film that will "never" yellow and stay flexible for years."

I also purchased the rubber decal squeegee.

 "The rubber decal squeegee in an important tool when applying water slide decals to any substrate. Applying a water decal without using this or similar tool will not give optical results."

Plus I purchased their Mounting Fluid. 

 
"The Clear Decal Mounting Fluid is a water based product designed especially for use with our water slide decal paper. This mounting fluid will improve the application process of the water slide decal especially when working with larger decals."

So following the instructions that came with the paper I was all set to go. 

My first project using the decals was the child's chair pictured below.  

Look closely at the top of the chair for the decal


Because I was starting with just one project I didn't want to waste a whole sheet of the decal paper for one image so with my Photoshop elements I loaded the page up with different images that I knew I'd use some day. 

Like with all things there is ALWAYS a learning curve even with the best written directions.  

My first problem was I did not spray enough of the fixative on the paper and the first image I cut from the paper bled all of it's colors.   So resprayed the remaining images with a bit more of the fixative and waited a full day before I used it,  just to be safe.  In the future what I think will work better is to do a few short sprays on the paper letting the fixative dry in between sprays to ensure that all areas are covered with the fixative. Again I'd like to wait 24 hours to mount the decals.

Second problem I had is I used the squeegee a bit to hard and wiped off part of the image. As you can see from my close up photo one side is missing the flowing flowers.   More lessons learned. 

I love these decals and have a few more projects planned. Below are some of the dishes I did using the decals. These dishes were meant for display only. 

Graphics from the Graphicsfairy
Don't you just love The Graphics Fairy French images. This image really looks great on this plate. 


So this dish was so pretty on it's own but I thought I'd mess with a good thing. Jury is out on whether or not I like it. I actually had three of these dishes and did not let one escape my madness. So it's understood the pink flowers were in the original design of the dish I just add the black image. I know .....what the heck was I thinking?
  
 So if you haven't tried water decals I suggest you do, the images look like they are painted on which adds a bit of pizazz to your objects. Just think twice before trying to enhance an already pretty piece like I did.


I'm joining these parties   
WTF Wednesday at Shabby Loco 
Brag Monday at the Graphicsfairy
Vintage Inspiration at Common Ground 

Saturday, February 11, 2012

Pillows Made From An Afghan!

I had this afghan sitting in my booth for quite a long time. I like to turn over merchandise in no less than 90 days and if something doesn't sell I either;
  1. mark it down
  2. do something else to it
  3. just bring it home to live with me. 

This afghan won choice number 2


I've seen some wonderful sweater pillows on  Pinterest and blogs and the picture below is just one of many.  The blog Brassy Apple has a simple tutorial on how she made them. You can find that HERE.

Source

So this Pinterest picture was my inspiration to the idea to create some simple pillows with my afghan.

There were some difference in the knit I used, mine was a very loose weave and because of this I decided the pillows needed a liner. I had some Ikea curtains from my other home that didn't make the grade in my new home but was perfect for the lining material. I cut my curtain/liner fabric the size of my pillows which was 12" x 16".   I like a plump pillow and for that reason always use the measurement of my pillow for my fabric pieces.

The afghan with it's loose weave has a lot of give which caused a problem trying to cut the exact size of the pillow . To solve this problem I just cut a piece of the afghan  larger than my lining and then pinned the liner to the cut piece from the afghan. Then following the outer edge line of the liner I zig zag stitched the liner to the afghan. Once that was done I cut off the excess afghan material.  I repeated again for the other side of the pillow.

Then I just placed the two pieces together right sides facing each other and sew them together leaving a bit of space open at the bottom to insert pillow.  After pillow was inserted I then just slip stitched the opening closed.


As you can tell from the picture I varied how the cable lines appeared on the pillows to give each one it's own distinct look.

From the one afghan I got 5 pillows with lots of scrap for something else (?)

These pillows will be sold in my booth at Knot On Main Street for $15. each.

I'm joining these parties   
 Pillows and Cushions Link Party at Threading My Way
Sunday's Best at My 1929 Charmer  
Newbie Link Party at Debbie Doo's

Monday, February 6, 2012

Making Gift / Pricing Tags Look Vintage

Yesterday I showed you how I made my white card stock look vintage.  My goal was to create tags for my items in my booth at Knot On Main Street. This is me paying attention to details.

So first I had to iron the sheets of coffee stained card stock so they would not jam up my printer. To be truthful I tried to skip this step with the result of my printer getting jammed. So out came the iron and a fast once over on each sheet corrected the problem.

QUICK TIP; those sheets I didn't print on but did iron are now stored under a very heavy book to keep them flat so they will be ready to use when I'm ready.

Next I created the images. I used Photoshop Elements to create my tags.

I first started looking at Karen's wonderful vintage images at the Graphics Fairy  and I found this wonderful frame called Fanciful Frame that I just love. With the magic wand tool in Photoshop I removed all the white in this image so I could layer the images of the ladies under it.
Fanciful Frame From Graphics Fairy
Next I picked out some images from my Dover Publications CD of Victorian Women's Fashion Photos .
I used the following three ladies to create 3 similar but different tags.

Such a sad pretty face don't you think?
She's my favorite, with the tilt of her hat
Lots of drama on her face, right?
I then re-sized the ladies images so they would fit nice and snug in the frame. I also set the opacity on the ladies images to 75%. (this actually lightened up the colors so they looked a bit more faded).

I added my booth number on each and also included my blog address. Here's how they looked in Photoshop. 


Next using Word I created a table and inserted the tag images into each box. Then printed on my coffee stained vintage looking paper. Below is how they came out.

My photo skills need sharpening. They look great in person.
The space between the booth number and the web address will be used for me to write a description and price with a fine point black sharpie.

I'm joining these parties 
Brag Monday at The Graphics Fairy 
Nifty Thrifty  Tuesday at Coastal Charm

Saturday, February 4, 2012

Making Vintage Looking Paper For Tags

It's all about the details and I know that to be true. So my pricing tags at my booth should look as vintage as my products.

 I've been printing up my pricing tags on white card stock and I realized it would look better if the paper was at least 50 years old or at least look that old.

The tools needed are;
  1. Instant coffee
  2. Foam brush
  3. 2 cups of boiling water
  4. White card stock 
 I used my microwave to boil my water. After that was done I added about 3 tablespoons of instant coffee to the boiled water.  I then let it cool down a bit before I started brushing.

I started brushing the rich instant coffee on to the paper. I carefully stroked the coffee onto the paper making sure that the stroke marks showed up on the paper. After I was happy that the paper had enough coffee I then let the sheets dry in the oven at a 200 degree temperature for about 1 minute.

Then after inspecting the dried paper I decided whether to repeat the process again to get a darker stained look.  2 applications of coffee was brushed on each piece of card stock.


Tomorrow I'll print my some images from the Graphic Fairy  onto the vintage looking paper.

Update: you can see the tags I created with this paper HERE

Tuesday, January 31, 2012

Just Frames!


A few weeks ago I had found a new flea market that I loved and scored some great items. One of those items were 6 plain wooden frames minus the glass. You can see them in the front of the photo.

I had the idea to create a french country look with them and Just Frames by themselves can make a nice decorating element and that was my vision as I redesigned them.


I'm not a big fan of spray paint but I opted to use it to make this process go much faster. Time is money, so they say. So I purchase yellow, red and black in gloss finish.  As I didn't want all 6 frames to be the same I switched them up a bit so that they were different but would still look great grouped together.  Each frame got a base coat and then after they were dry I painted on a bit of vaseline in areas and then sprayed the contrasting color. With the vaseline trick all you have to do is wait till the top coat dries and then wipe off and it will reveal the under coat. Some light sanding over the whole frame and then they ready for the umber glaze.

So frames were done but they needed a bit more to finish it off. So I tea dyed some muslin & gingham and then with that fabric added the bow in each corner.  I also designed a tag that suggests the use for these Just Frames

  I used one of the Graphics Fairy black and white borders and then just added my text. I like the idea of suggesting uses to my customers.  I also personalized it by signing my name at the bottom. (not shown)

These frames will be at my booth this week sitting in my red Coco Cola wooden case with a price of $6. each.

I'm joining these parties 
Vintage Inspiration Friday at Common Ground
Feathered Nest Friday at French Country Cottage
Fridays Unfolded at Stuff and Nonsense 
Inspiration Fridays At The Picket Fence
Sunday's Best Par Tay at My 1929 Charmer
Newbie Party at DebbieDoos  

Friday, January 27, 2012

Some Before And Afters!

I love when I get some really cool items at my favorite haunts that just need a bit of tweaking. Help of the kind like some spray paint that changes it from drab to fab or just a change of picture that enhances it's style.

Fruits Before 
These fruits I got at a local thrift store for a price that allows me to resell for a small profit. As you can see from the before picture they were lacking some love. One of the things I do is if I like it when I see it, I also have to like it when I pick it up. So these fruits looked good to me but if I picked them up and realized they were plastic or paper mache I wouldn't of been interested. But they were a type of metal and had some weight to them  so they made the grade. They would come home with me and get a makeover of some silver paint.

A few coats of silver spray paint and you almost wouldn't recognize them.  These guys would make a great paper weights.  So they are ready to go to my booth and I'll be asking $3 each.


I found this frame and picture also at a local thrift store and again the price was perfect for me to resell. The wood on the frame reminded me of a barn board type of wood even though it was painted a light turquoise color. The wood, the color, qualified this for the cottage chic category.
 I was surprised that no one had snatched it up. I suspect the problem was the picture inside the frame.  The frames were screaming "I"m shabby chic" and the picture was telling another whole story. Sometimes you just have look at an item and see what it can be and not what it is.

So I quickly looked on line at the Graphic Fairy's wealth of images and decided on the bird. The bird worked well with  its colors which complimented the already existing color of the frame. A vintage image coupled with the look of the frame I thought was a better fit.  Now little birdie and frame are sitting pretty  at my booth for $12 waiting for it's new home.


Tuesday, January 24, 2012

I Love Chalk boards!


So if you remember from one of my past posts about the 40 ammo boxes I bought, well it was time to paint up a few more tops into chalkboards.  You can see my first tops reported HERE.

I was able to get the sample size jars of the Martha Stuart paint at Home Depot for $1.00 (they are discontinuing the line) I picked a turquoise color called Lagoon and also a deep brick red called Chocolate Cosmos.

So I started by filling in the nail holes with some wood putty,  gave the top a quick sand, a coat of primer and I was ready to get started.

First coat of color was the brick red and I did that all around, even on the back leaving the chalk board area alone. Let it dry.

Next I painted over the red with the turquoise color. Let it dry. 

Because I knew that I'd be distressing the wood and adding a glaze I felt that a second coat of paint wasn't necessary.

So after the paint had dried I got out my trusty handy dandy orbital sander.  I'm not one for sanding by hand. So I lightly went over in the spots that I wanted the red to show thru to create that distressed look. The trick is to sand off the turquoise paint but not the red, this requires a light touch.

After that was done I used a glaze product I got from Woodcraft called Burnt Umber Glaze Effects

So I just brushed it on liberally and wiped down with a damp cloth. I find that wiping with a damp cloth eliminates brush marks  I love this stuff  it really is a great finish for distressed pieces.

So that part was done I then painted the chalk part using FolkArt brand of Chalk Board Paint. I needed to do 3 coats.


In all projects I learn something and this is true with this. What have I learned?  My first set of these I used the vaseline trick and also some crackle to expose the undercoat of paint. I didn't do that here. The brick red was such a great color combined with the turquoise  but I was a bit disappointed that the red didn't show up as much as I would of liked.  A little vaseline would of worked wonders for it. I'll use vaseline next time

I also learned that combining colors is fun and I'll do it again. Next I'm thinking of using that same red with a deep eggplant color.

Sunday, January 22, 2012

Flea Market Fun!

So I love shopping for what I call my finds. It could be at a thrift store, garage sale, auction or flea market and today I did the flea market scene.

Being new to the Clermont Florida area I'm not to familiar with the stomping grounds of great finds. Last week as I was traveling along SR 50 heading towards Orlando to attend an auction I noticed out of the corner of my eye a flea market. Not a small run of the mill type of market but the kind that could be classified as a swap meet. You know,  the kind that gets your heart pumping, palms sweating and fills you with anxiety to hurry up and get there. But I was already committed to the auction so I had to wait until TODAY!  

So I went and was I disappointed?    NOPE

I spent maybe 30 minutes in the market when I got the following from only 2 vendors.

Please excuse my picture the sun was pretty strong.

So the money spent was $80. and I got:
  1. A large oil painting (it's in the back) 
  2. A large picture (next to the oil painting)
  3. A shadow box table (it's got glass on top that lifts so you can showcase stuff) 
  4. A wooden carrying box
  5. 6  picture frames 
  6. 3 lime stained terra cotta pots. 
  7. Small picture (its sitting in the wooden box)
  8. Old wooden cabinet with glass door 
Tomorrow I travel to Dunedin to my booth to drop off some merchandise to sell.  Most of this stuff won't make the trip. Each thing I got today needs just a touch of tweaking but it will go in about 2 weeks when I make my next trip.

I also will be heading back to this flea market next Saturday and meet up with these vendors again to see what they got.  

Tuesday, January 17, 2012

Craigslist!

What's not to love about Craigslist?

1. It's Free!
2. It gets you customers! 

I know the concerns of safety especially after the infamous Craigslist killer, but in all things not just craigslist safety first. 

So before I moved I sold off some stuff from my apartment on Craiglist. Being a single woman I did not want anyone coming into my home without my having someone else there. That wasn't always possible. So when they emailed me they were interested they would call and set up a time to come and see the item and I'd make sure it was outside my door for them. It would be a bit funny because as much as I was unsure of them, they would come with someone which said to me they were unsure of me. 

Here in my new home I can't do that. I live in a gated community that would frown upon a business being conducted from my home.  I do have a booth at Knot on Main Street and before Christmas I started doing limited amounts of ads on Craigslist directing them to Knot  and am proud to say I have sold everything I posted. Here are the items I sold.

1. Vintage Sewing Machine


(sold 3) 


3. World Globe


With my marketing efforts for my business and the success I've had with Craiglist I'll be utilizing this FREE tool.  I'll be posting to that customer who loves the vintage, chic shabby, farmhouse country or French country look. Those type of customers read Craiglist. My subject line will be written specifically to attracts those customers.

Oh yeah, another plus will be a link to my blog that I'll include in the ad. Can always use more traffic to my blog. 


Do you use Craiglist for your business? Would love to hear how you are doing with it.

Thursday, January 12, 2012

So What Do You See?

So I found this big cooking pot at a thrift store some time last year. I know it was last year because I tried selling it in my booth at Knot On Main Street, my first time around being a vendor there.

I would like to think the history of this pot was sauce sitting on a stove Sunday morning simmering away with meatballs, sausage and possible some braciole.

Maybe on Wednesday it was a stew simmering all day filled with meat and vegetables.  I'm starting to get hungry.

But I have to tell you when I saw this pot with it's wonderful patina, I wasn't thinking about cooking. I saw it as a hanging flower pot filled with red geraniums or possible a place to put rolled up white towels for a guest bathroom. I didn't see a cooking pot, no I didn't. Unfortunately the customers walking thru my booth didn't see those things I envisioned, they probably saw Grandmother's old cooking pot.

I needed to help them to see my vision. Now I could of purchased some white towels, rolled them up displayed in the pot but that would of added considerable amount to the retail price.  I opted to give it some help showcasing it as a possible hanging planter. 

 
I went to Michaels and purchased some sheet moss. and cut strips and glued them all around the top edge of the pot with my trusty glue gun.   The pot and the moss now shouts I've been REBORN.

I liked the way it came out and I priced it a bit higher than before.  I priced it at my booth for $10.00  It makes for an adorable interesting different planter.  Oh yes I also added a burlap bow for good measure. I love burlap!